
10 Important Nondestructive Editing Techniques for Photo Manipulators
- Oct 21, 2020
- 4 min read
1. Convert your layers into a Smart Objects
It’s surprising how many people don’t use Smart Objects – the most important nondestructive editing technique. Smart Objects are layers – just smarter. Unlike regular layers, Smart Objects give you:
Nondestructive transformations. You can scale, rotate, skew, etc. multiple times without losing the original image quality. For example, if you were to scale layer to a smaller size then decide you want to enlarge it back later, you can do so without losing any image quality.
Nondestructive filterings. When you apply filters to Smart Objects, they are applied as Smart Filters which lets you edit the settings at any time. Most filters in Photoshop CS6 are compatible with Smart Objects.
Syncing/Linked instances. If you duplicate a Smart Object, you can update the contents within the Smart Object and both of the layers will be updated. This is useful when you need more than one copy of the same layer but want they all to be synchronize.
To convert your layers into Smart Objects, right-click on the layer then choose Convert to Smart Object.

2. Use the File > Place command to place images
Often times, photo manipulators would open an image in Photoshop then copy & paste it to another document. There’s no reason to do this anymore. Copying & pasting takes more time and effort and the Place command automatically places your image as a Smart Object saving you even more time. Bokeh Brushes
Using the File > Place command also lets you place RAW, AI, and other types of files directly as Smart Objects. For example, you can place your RAW files and use the Adobe Camera RAW to edit the RAW file at any time just by double-clicking on the Smart Object. You no longer have to convert your RAW files into JPG images before placing them into your photo manipulation.
3. Use layer and clipping masks
Most of you already know about layer and clipping masks but they still aren’t being used properly by many. A lot of times, photo manipulators would create a cutout of the image directly on the layer then use a layer mask to erase more parts of an image. If your layer was a Smart Object, Photoshop would prevent you from doing this and force you to make changes in your layer mask. If one layer mask isn’t enough, you can always add more by placing them into groups.
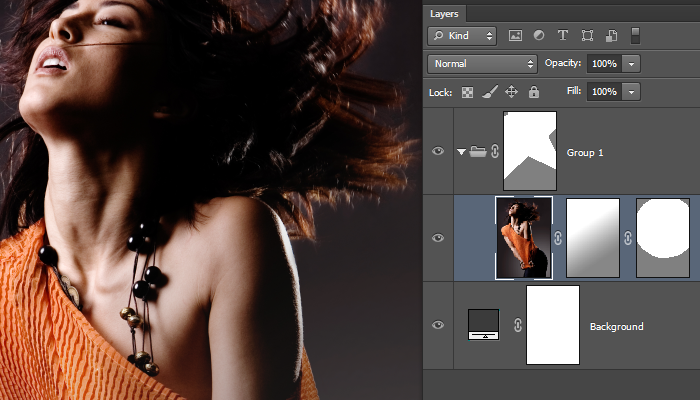
Need to use more than one layer mask? Put it into a group and add a layer mask to the group.
Clipping masks is another great way of recycling those layer masks/cutouts you’ve created. Instead of copying/pasting layer masks, just use clipping masks. If you really can’t use clipping masks, you can always place those layers into a group and apply a layer mask to the group instead. With Photoshop CS6, you can even clip layers to layer groups.

Recycle layer masks with clipping masks.
4. Keep photo effects simple
There are many ways to apply photo effects and most of them can be created with few adjustment layers. It’s easy to keep stacking layers upon layers to get the photo effect you want – try recreating the same photo effect using fewer layers. Photo effects should be created from a series of layers that you understand; not a random stack created by chance. Complex photo effects are messy and can degrade the image quality and reduce the dynamic range of your artwork.
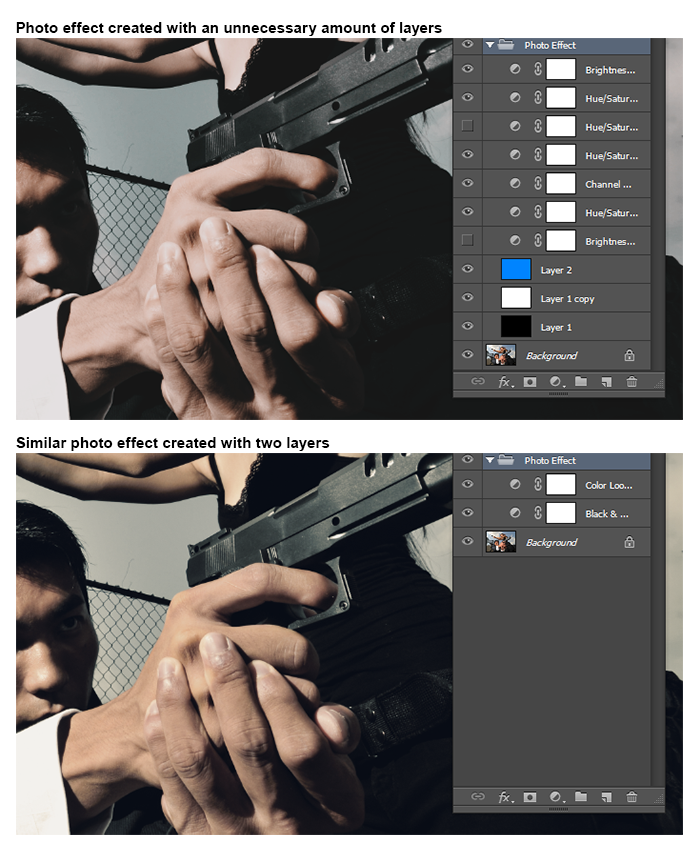
Complex photo effects are often similar to simple photo effects.
5. Use Smart Filters
One benefit of Smart Objects is Smart Filters. When you convert your layers to Smart Objects, you can use Smart Filters which is basically the non-destructive way to use filters. Smart filters let you change the settings anytime and give you the ability to apply blending modes to the filters. Don’t duplicate a layer just so you can nondestructively apply a filter to it. Convert that layer into a Smart Object then apply filters as Smart filters.

6. Dodge and Burn on a single layer
Dodging and burning is an essential part of photo manipulations and this technique can leave your PSD with many unnecessary layers. You also can’t dodge/burn directly on a Smart Object but there is a way around this:
Create a new layer. Go to Edit > Fill. Select 50% gray from the drop down menu then click OK.
Change the blending mode to Overlay (experiment with other blending modes like Soft Light, Hard Light, etc.).
Dodge and burn on this gray layer.

7. Crop non-destructively
The easiest nondestructive editing technique is to crop nondestructively. When you select the Crop tool, disable the “Delete Cropped Pixels” option in the options bar. Essentially, this will tell Photoshop to keep all the data so that you can uncrop your image at a later time.

8. Organize your layers with names, groups, and labels
Photo manipulations can turn into a mess of layers. Always keep your layers organized because this will save you time and force you to use more efficient editing techniques. Plan a way to organize your layers. For example, you can group your layers by foreground, middleground, and background. You can also group layers by the objects in your photo manipulation. There are many ways to group layers; choose the one that makes the most sense to you.


9. Keep layers to a minimum
Back then, you had serious bragging rights if you had a 100-layers PSD – because it means you put a lot of time and attention to your artwork. Now it just means that you’re not efficient. With all the non-destructive editing techniques Photoshop CS6 has to offer, you no longer have to resort to a bunch of raster layers. Find ways to keep the layers to a minimum using Smart Objects, Smart Filters, clipping masks, etc.

10. End your bad habits. Practice non-destructive editing techniques
All these tips are useless if you have a habit of working quick and messy. Bad habits are easy to form but harder to live with. Good habits are harder to form but easy to live with. Changing your habits is one of the most difficult things for designers – because why learn new nondestructive editing techniques when old ones work just fine?
Nondestructive editing can feel like more work and it certainly felt that way when I first started. But after a few practices, I found that they actually made my workflow easier and faster. Once you get the hang of it, you’ll be using non-destructive techniques without even thinking of it and that’s when you become better at Photoshop. End your bad habits and start using nondestructive editing techniques today.


Comments